Category Archives: Electronic Design

“FIPS 140 Made Easy” Part 2

Continued from “FIPS 140 Made Easy” Part 1…

“Do you have any suggestions for me?”

“Sure,

  1. Maybe you only need a level 4 for one of the areas.  For example, let’s say you only need to meet the FIPS 140-2 level 4 physical security requirements.    It’s possible have your device’s physical security certified a level 4, but have an overall certification level of 2.  This might be good enough for the application your customers have in mind, and it will take much less time and money to get the certification.

    Pick your FIPS 140 compliance levels carefully.

    Compliance levels may vary by FIPS 140 section

  2. Consider changing your design so that it has approved and non-approved modes of operation.  Some of your customers may not want a device that obeys all the rules of FIPS 140-2.   You can retain a non-approved mode of operation that will function in a way that will still satisfy those customers.
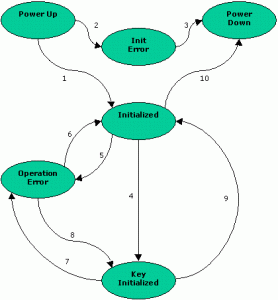
  3. Make the Finite State Machine description of your device as simple as possible.  That means with as few states and as few ways to move between those states a possible.   These should be a high level finite state machine.  Your device will obviously have many more low level states, but the more states you add to your high level description, the more work you’ll make for yourself and the more work you’ll make for the certifying lab.

    Don't get hung up trying to get your FIPS 140 Finite State Machine fully describe the device operation.

    Make your FIPS 140 Finite State Machine simple

  4. If there is an embedded OS, consider designing your system so that the OS cannot be modified.  If you don’t do this, for level 2 devices and above, you’re going to need to ensure that the operating environment is evaluated to at least Common Criteria Effective Assurance Level 2 (EAL 2).  If the operating environment hasn’t already been evaluated, the addition work necessary will significantly increase your development costs, and will cause significant schedule delays.”

“What about FIPS 140-3?”

To be continued…

“FIPS 140 Made Easy” Part 3

Continued from FIPS 140 Made Easy part 2…

“What about FIPS 140-3?”

“You should probably check the FIPS 140-3 standard as well.  Presently, it’s in a draft form.  So, it could change.  Still, it’s possible FIPS 140-3 could become the new standard before you’re through with your current certification effort.  Knowing what’s in it shouldn’t hurt you.  Here’s the link for you…”

http://csrc.nist.gov/publications/PubsDrafts.html#FIPS-140–3

“Anything else?” asked the product manager.

“Yes.  The next time you design a crypto device, consider whether you need a FIPS 140 certification and what level of certification you might need during the requirements definition phase.  It is usually easier to get your crypto design certified when it is designed to meet the security requirements from the outset.  Modifying an existing design to meet the same requirements, after the fact, can be quite difficult. “

The information security engineer got the job, but it was a short contract.  Soon, the product manager began to realize how important that last piece of advice was, and the company decided it didn’t have the time or the money to seize that big government business opportunity.

The End

Including Test Points in Prototypes

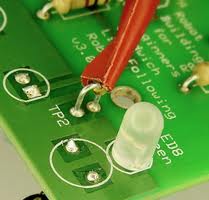
Easy to use test point designed into circuit board

Circuit board with test point

A team of manufacturing test engineers was puzzled.  The spacecraft circuit board was failing tests, and not just a few tests.  It was failing all of the tests.  Spacecraft circuit boards aren’t inexpensive items, so a team of engineers went to work to determine exactly what had gone wrong.  To figure it out, they had to saw open integrated circuits and take microscopic photographs of the semiconductors. On the first of these, they noticed a path burned between the power input pin, Vcc, and the ground pin, Gnd.  Each subsequent chip examined provided the same evidence.  It appeared that someone or something had misapplied power to the unit under test.    At first, everyone was confused as to how this could have happened.  After all, the power supply cable that connected to the circuit board was keyed and was only capable of providing the correct input voltage.  Later, however, the problem was identified.  The technicians weren’t using this cable.  Instead, they were applying power to the circuit board though some test points in the test jig.   These test points were included for making measurements of the voltage applied to the circuit board.  After many tests, it seems someone had mistakenly connected the positive lead of the power supply to the ground test point, and the negative lead to the Vcc test point.  That was all that was necessary to destroy the circuit board and throw the schedule off by a month.


Insulated test points can help prevent accidental short circuits during testing

Test points with insulators

Normally, including a generous number of test points on circuit boards and on test jigs is a great idea.  This is particularly true for prototypes where at least some troubleshooting should be expected.  This makes it much easier for a lab technician to make measurements, and this saves time.   Of course, in many cases, it is also important to include current limiting resistors.  This will help prevent the sort of consequences described above and can also be important for the safety of you test crew.

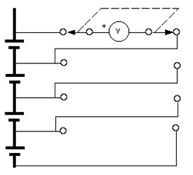
This design does not include test current limiting resistors.  This can cause problems.

Without current limiting resistors

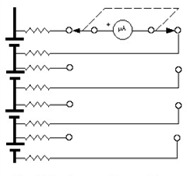
Including current limiting resistor with your test points can help avoid problems.

Battery test points with current limiting resistors

With current limiting resistors

copyright 2013 NetChime Research LLC,  All rights reserved.


The Next Big Thing


In 1999, a group of software product developers made a habit of taking morning breaks to get away from their computers and to bounce ideas off of one another.    They would walk over to a nearby coffee shop, share experiences, tell jokes and offer advice.  On average, it was a 20-minute event that occurred three times a week.  Recognizing that this activity was not only building camaraderie, but fostering creative thinking, their manager encouraged them and frequently participated himself.

Of the many topics discussed, two themes kept recurring…  “What’s going to be the Next Big Thing?” and “How are we going to get rich with it?”  Many ideas were suggested, and many were shot down.  After going through this exercise several times, the group came up with the following list identifying characteristics of “The Next Big Thing…”

1)   The idea would have to catch on like an out of control chain reaction.  The first event would lead to other events, and these events would result in more events, and so on.  Think of an avalanche triggered by rolling a single boulder down a hill.

2)   The number of times those events would repeat could not be limited to a small number of potential customers, users or subscribers.    In other words, the market had to be huge.

3)   The person or group triggering the reaction would have to possess the unique capability to do so.  Because most reactive environments aren’t limitless, they didn’t want to start a chain reaction that competitors might notice and then quickly duplicate for their own benefit.  Consequently, the reaction had to happen so quickly that potential competitors could only obtain a negligible market share.   Also, the time necessary to get involved could provide a barrier to delay competition.

4)   The resources necessary to trigger the chain reaction had to be within grasp.
These guys didn’t have lots of resources.  So they needed an idea they could execute without giving away large portions of the opportunity to investors or service providers.

5)   The cost to trigger the first event had to be negligible compared to the expected gains.

6)   The probability of success had to be reasonable.

7)   The plan had to be simple and innovative.

Today, these product developers would probably all agree that having a great idea is only part of the equation.  Along with having a great idea, an excellent plan is required, and the plan must be executed with precision.  The right team is also needed.  This team must have the right skills and a great deal of passion.  Otherwise, the team will not be able to move quickly enough.  This isn’t to say that the list of “next big thing” characteristics was wrong.  Those characteristics are still needed, but those are only the characteristics of the next big idea.  Those aren’t the characteristics of the plan and team that are going to make it happen.

A number of friends from the original group have stayed in touch for years.  Three have started small businesses.   Although one of these businesses was significantly more successful than the others, none of the start-ups hit the spot as far as greatly exceeding the founders’ wildest dreams.   Nonetheless, they did OK.   So, the friends still get together from time to time, and this is what they talk about now…

“What’s going to be the Next Big Thing?” and “How are we going to get rich with it?”


Copyright 2013 NetChime Research LLC,  All rights reserved.

http://www.netchime.com

Using the Arduino to Add Analog Inputs to Your Prototype

There is a small company who developed a very cool device with an embedded processor.   To speed their prototype development effort, the company used a commercial-off-the-shelf (COTS) processor board.   This processor came with an open source operating system and some convenient interfaces, which allowed the designers to use the same processor for software development.   They made a nice looking enclosure for the device, found a compatible power supply, and quickly assembled something they would be proud to show a potential investor.

Unfortunately, after all that hard work, they realized they needed an analog input that they didn’t have.  It was for a volume control knob, which they felt would greatly improve the user experience.  At the time they were shopping for the processor board, they didn’t realize they needed that analog input.  Consequently, although being very careful to select something powerful and flexible, they picked something that fell short in this small, but important area.

Here’s how they solved the problem.  They added another processor, one that you don’t see often in commercial prototypes.   They added an Arduino Duemilanove.  Yes, the Arduino is one of the processors you see advertised in electronic hobbyist
e-zines.  Hobbyists love these devices, because they are inexpensive and easy to use.   Well… guess what?  Professionals also love devices that are inexpensive and easy to use.

They could use Arduino, because the original COTS processor had an extra USB interface.  At first, the idea of using an Arduino to provide the analog interface received resistance.   They were told, “You don’t understand the complexities of the USB protocol stack.”  And “This approach will take too long to code up. “

So they took a little time to investigate the approach.  This is what they found.  It was easy, so easy, in fact, that they were able to demonstrate the solution in less than 4 hours.   They connected a little potentiometer up to the Arduino with three wires.  That was that easy.  They found a pre-written script for sampling an analog input and transmitting those samples over the Arduino’s USB interface.   And that was easy.  They downloaded and installed the Arduino development software and then loaded the Arduino sampling script into the Arduino.  Next, they connected the Arduino to the COTS processor.  They had to write a little shell script to run on the open source operating system to see their results, but that was easy too.    This was just another serial device as far as the operating system was concerned.

What was really nice was that the Arduino got its power through the USB interface.  So, it was not necessary to provide another voltage source to power the Arduino.

Also, since the Arduino is small, they could fit it inside the existing enclosure.

In the field of rapid prototype development, you need to be creative, and you need to think out of the box.  But most of all, you need to be quick.   If you’re taking too long to implement the next wiz bang device, you might just be allowing your competition to beat you to the market.  That can mean missing a grand opportunity.  The company realized this, and they did what needed to be done.

After the accomplishment, the team jokingly claimed “we have just constructed the world’s most expensive volume control knob,” but they all knew the truth.   When it comes to prototype development, time is money, and this was the least expensive way to achieve the desired result and still make their schedule.

copyright 2013 NetChime Research, LLC,  All rights reserved.

http://www.netchime.com