Controlling Your Interfaces (Part 1)

It was July 2000 and one could imagine the product manager’s frustration when he learned the news.  A hacker, going by the handle “Kingpin,” had found a vulnerability in the iKey® 1000*.  Furthermore, @Stake, a company associated with Kingpin was planning to go public with this information by publishing a security advisory.  The iKey® 1000 was poised to be a great success, and the last thing the Rainbow Technologies ** product manager needed was to have his information security device branded as “insecure.”

Joe Grand is known for white hat hacking

Joe Grand aka “Kingpin”

Fortunately, there was time to act.  @Stake had given Rainbow a grace period, just enough time to admit that @Stake had found something significant and to promise Rainbow’s customers that some necessary changes would be coming.    So, when @Stake released the advisory, describing the attack in sufficient detail for hackers to reproduce it, they also expressed admiration for Rainbow’s professionalism and responsiveness.

See  http://dl.packetstormsecurity.net/advisories/l0pht/l0pht.00-07-20.ikey

This was a consolation for Rainbow Technologies.  Of course, they would have looked better, if @Stake had not found the vulnerability.

The iKey® 1000 was designed to store passwords and private keys for authentication purposes, thus providing a means for 2 factor authentication.   The first factor (something you have) was the iKey® 1000, and the second factor (something you know) was a user password.  To access the passwords and private keys stored in the device, the user would provide the user password, and the iKey® 1000 would then provide access to the private keys or other passwords stored within it.  There was also a master password that could be used to access all of the iKey® 1000’s stored secrets.

* iKey® is a registered trademark of Safenet.
** In 2004, SafeNet merged with Rainbow Technologies.

To be continued in “Controlling Your Interfaces (Part 2)”

Controlling Your Interfaces (Part 2)

Continued from “Controlling Your Interfaces (Part 1)”

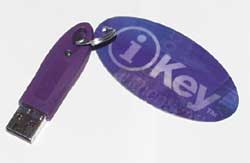
Inside the iKey® 1000 there was a microprocessor and a serial EEPROM.    The EEPROM is where the secrets were stored.  What Kingpin was able to do was find out where an encoded (obfuscated) hash of the master password was stored in the EEPROM.  He could do this because Rainbow had provided a direct interface to the EEPROM.  Rainbow had done this intentionally by making an internally available interface for adding more memory to the iKey® 1000.  Rainbow purposely did not apply a conformal coat this interface, so that the iKey® 1000 could be easily upgraded.

This device had a vulnerability that was found by a hacker.

The Rainbow Technologies iKey(r) 1000

Kingpin was able to access the memory through this interface, figure out the encoding function (and its inverse function).    This meant that anyone understanding the technique could get to the iKey 1000’s secrets without the user or master passwords.

See  http://ebookbrowse.com/safenet-datasheet-ikey-1000-pdf-d106292414

Rainbow could have done many things to make @Stake’s attack more difficult.  For example, Rainbow could have done a better job of controlling the interface to the EEPROM.    One way to do this would have been to encase everything but the USB interface of the PCB in epoxy.

Companies frequently include “back doors,” expansion ports and/or test interfaces in systems for their own purposes.   These interfaces provide potential new avenues for attack.  If you find that you need to include interfaces like these in your company’s products or systems, consider including some controls that will make it difficult for attackers.  Insufficient interface control is a common security problem in information systems.  While, overall, it may be true that the percentage of people with the skills and intent to exploit your interfaces is low, there are still lots of people and organizations with the skills and many of these would be happy to give it a try.   Why make it easy for them?

“FIPS 140 Made Easy” Part 1

The product manager smiled and offered his guest some coffee.  “What we’ve managed to do is build a high performance cryptographic processor with just the right combination of algorithms and other characteristics.   This has uniquely positioned our company for a rapidly growing market.  It turns out that the US government is very interested, and we can seize a significant portion of this opportunity by moving quickly.  The only problem is that the government wants our device to be FIPS certified before they’ll commit to buying any.”  The product manager paused and waited for a response from his guest, an information security engineer who had had experience designing products to meet NIST’s FIPS140-2 requirements.

Getting a FIPS 140 Cert can be challenging

Typical FIPS 140 Certification

His guest suppressed a smile when he heard that getting a FIPS certification was “the only problem.”  He knew from what had been said so far that there were many other problems.  That’s because FIPS 140-2 consists of many requirements, and each one can result in a significant amount of work.   He had been through this scenario twice before, and in both cases, the same big mistake had been made.  The design engineers should have known about the FIPS 140-2 requirements from the beginning.  Now there were bound to be software changes, retesting and additional troubleshooting.  “Do you know what level of certification you need?” he asked.

“We’re thinking level 4.” the product manager replied.  “Do you think that will be a problem?”

“Well… if you haven’t been designing for a level 4 FIPS certification up to this point, it’s highly likely you’re going to need both hardware and software design changes.”

“Do you have any suggestions for me?”

To Be Continued…

“FIPS 140 Made Easy” Part 2

Continued from “FIPS 140 Made Easy” Part 1…

“Do you have any suggestions for me?”

“Sure,

  1. Maybe you only need a level 4 for one of the areas.  For example, let’s say you only need to meet the FIPS 140-2 level 4 physical security requirements.    It’s possible have your device’s physical security certified a level 4, but have an overall certification level of 2.  This might be good enough for the application your customers have in mind, and it will take much less time and money to get the certification.

    Pick your FIPS 140 compliance levels carefully.

    Compliance levels may vary by FIPS 140 section

  2. Consider changing your design so that it has approved and non-approved modes of operation.  Some of your customers may not want a device that obeys all the rules of FIPS 140-2.   You can retain a non-approved mode of operation that will function in a way that will still satisfy those customers.
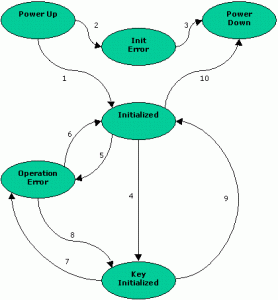
  3. Make the Finite State Machine description of your device as simple as possible.  That means with as few states and as few ways to move between those states a possible.   These should be a high level finite state machine.  Your device will obviously have many more low level states, but the more states you add to your high level description, the more work you’ll make for yourself and the more work you’ll make for the certifying lab.

    Don't get hung up trying to get your FIPS 140 Finite State Machine fully describe the device operation.

    Make your FIPS 140 Finite State Machine simple

  4. If there is an embedded OS, consider designing your system so that the OS cannot be modified.  If you don’t do this, for level 2 devices and above, you’re going to need to ensure that the operating environment is evaluated to at least Common Criteria Effective Assurance Level 2 (EAL 2).  If the operating environment hasn’t already been evaluated, the addition work necessary will significantly increase your development costs, and will cause significant schedule delays.”

“What about FIPS 140-3?”

To be continued…

“FIPS 140 Made Easy” Part 3

Continued from FIPS 140 Made Easy part 2…

“What about FIPS 140-3?”

“You should probably check the FIPS 140-3 standard as well.  Presently, it’s in a draft form.  So, it could change.  Still, it’s possible FIPS 140-3 could become the new standard before you’re through with your current certification effort.  Knowing what’s in it shouldn’t hurt you.  Here’s the link for you…”

http://csrc.nist.gov/publications/PubsDrafts.html#FIPS-140–3

“Anything else?” asked the product manager.

“Yes.  The next time you design a crypto device, consider whether you need a FIPS 140 certification and what level of certification you might need during the requirements definition phase.  It is usually easier to get your crypto design certified when it is designed to meet the security requirements from the outset.  Modifying an existing design to meet the same requirements, after the fact, can be quite difficult. “

The information security engineer got the job, but it was a short contract.  Soon, the product manager began to realize how important that last piece of advice was, and the company decided it didn’t have the time or the money to seize that big government business opportunity.

The End

Including Test Points in Prototypes

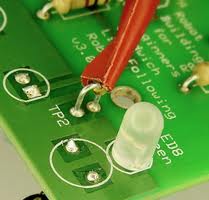
Easy to use test point designed into circuit board

Circuit board with test point

A team of manufacturing test engineers was puzzled.  The spacecraft circuit board was failing tests, and not just a few tests.  It was failing all of the tests.  Spacecraft circuit boards aren’t inexpensive items, so a team of engineers went to work to determine exactly what had gone wrong.  To figure it out, they had to saw open integrated circuits and take microscopic photographs of the semiconductors. On the first of these, they noticed a path burned between the power input pin, Vcc, and the ground pin, Gnd.  Each subsequent chip examined provided the same evidence.  It appeared that someone or something had misapplied power to the unit under test.    At first, everyone was confused as to how this could have happened.  After all, the power supply cable that connected to the circuit board was keyed and was only capable of providing the correct input voltage.  Later, however, the problem was identified.  The technicians weren’t using this cable.  Instead, they were applying power to the circuit board though some test points in the test jig.   These test points were included for making measurements of the voltage applied to the circuit board.  After many tests, it seems someone had mistakenly connected the positive lead of the power supply to the ground test point, and the negative lead to the Vcc test point.  That was all that was necessary to destroy the circuit board and throw the schedule off by a month.


Insulated test points can help prevent accidental short circuits during testing

Test points with insulators

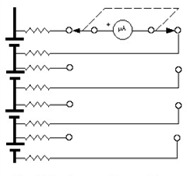
Normally, including a generous number of test points on circuit boards and on test jigs is a great idea.  This is particularly true for prototypes where at least some troubleshooting should be expected.  This makes it much easier for a lab technician to make measurements, and this saves time.   Of course, in many cases, it is also important to include current limiting resistors.  This will help prevent the sort of consequences described above and can also be important for the safety of you test crew.

This design does not include test current limiting resistors.  This can cause problems.

Without current limiting resistors

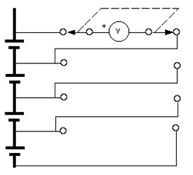
Including current limiting resistor with your test points can help avoid problems.

Battery test points with current limiting resistors

With current limiting resistors

copyright 2013 NetChime Research LLC,  All rights reserved.


Prototyping with Stereolithography

A group of designers built a number of 3D models of a toy robot using Rhino.  Next, they chose to build a reduced scale mock-up of their favorite design.    3-D printing is a great tool for rapid prototype development, because there isn’t the wait for tooling normally associated with other methods.  The 3-D printing process the designers chose was stereolithography.  This is was their model…

Model of Toy Robot

Rhino Model of Toy Robot

In stereolithography, an elevator floor is submersed just below the surface of a vat of a liquid polymer.  This substance has the characteristic that it will harden when exposed to a laser light.  The laser light is precisely focused and aimed to harden the liquid at specific points.  When the floor is just below the surface of the liquid, these hardened points will stick to the floor.  By scanning the beam over the surface of the fluid, a 2-D pattern of hardened points may be arranged on the floor.  After this is done, the floor is lowered slightly into the vat.  The laser scans the surface of the liquid again, attaching another 2-D layer of points onto the last layer.  This process is repeated, again and again, lowering the floor with each iteration.    After the last iteration, a 3-D form, consisting of stacked 2-D layers, can be found immersed in that vat.  The floor is then raised from the vat with the finished product resting atop.

This was the result of the designers’ effort, a 3-D prototype robot with no arms…

Toy Robot Prototype is missing its arms.

Toy Robot Prototype

What went wrong?  When building prototypes with stereolithography, it is sometimes necessary to also design a scaffold to provide a layer for the other layers to “rest upon.”  The designers knew this, but designed a scaffold lacking the necessary rigidity to support the heavy robot arms.  Consequently, the scaffold flexed too far before the arms could be connected to the shoulders.

So, when using stereolithography for your next rapid prototype, remember to include a sufficiently strong scaffold to support the overhanging members.  Otherwise, your rapid prototype might not be prototyped as rapidly as you would have hoped.


copyright 2013, NetChime Research LLC, All Rights Reserved

NetChime.com


The Next Big Thing


In 1999, a group of software product developers made a habit of taking morning breaks to get away from their computers and to bounce ideas off of one another.    They would walk over to a nearby coffee shop, share experiences, tell jokes and offer advice.  On average, it was a 20-minute event that occurred three times a week.  Recognizing that this activity was not only building camaraderie, but fostering creative thinking, their manager encouraged them and frequently participated himself.

Of the many topics discussed, two themes kept recurring…  “What’s going to be the Next Big Thing?” and “How are we going to get rich with it?”  Many ideas were suggested, and many were shot down.  After going through this exercise several times, the group came up with the following list identifying characteristics of “The Next Big Thing…”

1)   The idea would have to catch on like an out of control chain reaction.  The first event would lead to other events, and these events would result in more events, and so on.  Think of an avalanche triggered by rolling a single boulder down a hill.

2)   The number of times those events would repeat could not be limited to a small number of potential customers, users or subscribers.    In other words, the market had to be huge.

3)   The person or group triggering the reaction would have to possess the unique capability to do so.  Because most reactive environments aren’t limitless, they didn’t want to start a chain reaction that competitors might notice and then quickly duplicate for their own benefit.  Consequently, the reaction had to happen so quickly that potential competitors could only obtain a negligible market share.   Also, the time necessary to get involved could provide a barrier to delay competition.

4)   The resources necessary to trigger the chain reaction had to be within grasp.
These guys didn’t have lots of resources.  So they needed an idea they could execute without giving away large portions of the opportunity to investors or service providers.

5)   The cost to trigger the first event had to be negligible compared to the expected gains.

6)   The probability of success had to be reasonable.

7)   The plan had to be simple and innovative.

Today, these product developers would probably all agree that having a great idea is only part of the equation.  Along with having a great idea, an excellent plan is required, and the plan must be executed with precision.  The right team is also needed.  This team must have the right skills and a great deal of passion.  Otherwise, the team will not be able to move quickly enough.  This isn’t to say that the list of “next big thing” characteristics was wrong.  Those characteristics are still needed, but those are only the characteristics of the next big idea.  Those aren’t the characteristics of the plan and team that are going to make it happen.

A number of friends from the original group have stayed in touch for years.  Three have started small businesses.   Although one of these businesses was significantly more successful than the others, none of the start-ups hit the spot as far as greatly exceeding the founders’ wildest dreams.   Nonetheless, they did OK.   So, the friends still get together from time to time, and this is what they talk about now…

“What’s going to be the Next Big Thing?” and “How are we going to get rich with it?”


Copyright 2013 NetChime Research LLC,  All rights reserved.

http://www.netchime.com

Using the Arduino to Add Analog Inputs to Your Prototype

There is a small company who developed a very cool device with an embedded processor.   To speed their prototype development effort, the company used a commercial-off-the-shelf (COTS) processor board.   This processor came with an open source operating system and some convenient interfaces, which allowed the designers to use the same processor for software development.   They made a nice looking enclosure for the device, found a compatible power supply, and quickly assembled something they would be proud to show a potential investor.

Unfortunately, after all that hard work, they realized they needed an analog input that they didn’t have.  It was for a volume control knob, which they felt would greatly improve the user experience.  At the time they were shopping for the processor board, they didn’t realize they needed that analog input.  Consequently, although being very careful to select something powerful and flexible, they picked something that fell short in this small, but important area.

Here’s how they solved the problem.  They added another processor, one that you don’t see often in commercial prototypes.   They added an Arduino Duemilanove.  Yes, the Arduino is one of the processors you see advertised in electronic hobbyist
e-zines.  Hobbyists love these devices, because they are inexpensive and easy to use.   Well… guess what?  Professionals also love devices that are inexpensive and easy to use.

They could use Arduino, because the original COTS processor had an extra USB interface.  At first, the idea of using an Arduino to provide the analog interface received resistance.   They were told, “You don’t understand the complexities of the USB protocol stack.”  And “This approach will take too long to code up. “

So they took a little time to investigate the approach.  This is what they found.  It was easy, so easy, in fact, that they were able to demonstrate the solution in less than 4 hours.   They connected a little potentiometer up to the Arduino with three wires.  That was that easy.  They found a pre-written script for sampling an analog input and transmitting those samples over the Arduino’s USB interface.   And that was easy.  They downloaded and installed the Arduino development software and then loaded the Arduino sampling script into the Arduino.  Next, they connected the Arduino to the COTS processor.  They had to write a little shell script to run on the open source operating system to see their results, but that was easy too.    This was just another serial device as far as the operating system was concerned.

What was really nice was that the Arduino got its power through the USB interface.  So, it was not necessary to provide another voltage source to power the Arduino.

Also, since the Arduino is small, they could fit it inside the existing enclosure.

In the field of rapid prototype development, you need to be creative, and you need to think out of the box.  But most of all, you need to be quick.   If you’re taking too long to implement the next wiz bang device, you might just be allowing your competition to beat you to the market.  That can mean missing a grand opportunity.  The company realized this, and they did what needed to be done.

After the accomplishment, the team jokingly claimed “we have just constructed the world’s most expensive volume control knob,” but they all knew the truth.   When it comes to prototype development, time is money, and this was the least expensive way to achieve the desired result and still make their schedule.

copyright 2013 NetChime Research, LLC,  All rights reserved.

http://www.netchime.com

Holistic Security

Once upon a time, back around 1998, there was this network security specialist.  He won a small contract to evaluate the network security stance of a building owned by a large organization that was “serious” about security.  Eager to provide excellent service, he went to work in earnest.  He was quickly rewarded when he found the organization did indeed have some vulnerabilities, most notably, a situation, where, through an SQL injection attack, the organization’s entire database was completely exposed.  This will impress my customer, he thought, but he dug deeper.  Eventually, he found evidence that the company had already been hacked.  He documented this for his “final report,” but kept digging.  He then found that this wasn’t the first time this organization had been hacked.  It had happened more than once before.  In fact, this network was the scene of a battle between two groups of hackers that had been fighting against one another for months.   The two groups had been taunting each other, which simplified the job of tracking them.   Surely, this fact would impress the customer, but the network security specialist went further and found evidence of another intruder, one who was a bit more cunning, one who was far more sophisticated in covering his tracks.  It was fortuitous that this intruder couldn’t resist protecting his captured territory by removing the vulnerabilities that might allow others to follow him.  This fact was crucial in his detection.

Eventually, the money ran out, the network security specialist stopped digging, the final report was written, and the contract ended.    The network security specialist was a disappointed.  There was obviously more work to be done.  What bothered him most was that he knew the network under examination was connected to other networks and other “friendly” organizations that probably had similar problems.   One of recommendations in the final report was “These other networks should also be examined…”  Certainly, if intruders can get into one of these networks, intruders would have no problem getting back into the network under examination.

Not knowing the story from another perspective, one may wonder why the network security specialist wasn’t rewarded with more work.   Perhaps it was a matter of money.  The IT manager that hired him obviously didn’t have an unlimited supply, and specialists do cost money.  Specialists find problems that need to be fixed.  This takes time too.   It’s also possible the network security specialist had unwittingly endangered the reputation of his customer.  His work product was a report that, if mishandled, could make the customer look negligent.  After all, in the final analysis, it was the IT manager’s responsibility to make sure things like this didn’t happen.  Imagine his feelings on learning about what had been happening right under his nose.

In the end, the decision of whether to keep the network security specialist was probably made based on the principals of Holistic Security.  The IT manager had something he valued, an asset like his budget, his time or his reputation.  The network security specialist represented a threat to that asset, and a decision was made not to renew the contract.   This brings us to an interesting observation…

Everyone, whether they know it or not, is a security specialist.    Everyone has something they value, and everyone will do things to enhance and protect those things.

Holistic security is about being continuously aware of

  1. Assets: The things we have and value
  2. Threats:  The things that threaten our assets
  3. Security Functions:  The things that protect us from these threats
  4. Opportunities:  The things we don’t have and want
  5. Barriers:  The things that prevent us from seizing these opportunities

It is important that this awareness is continuous, because these things can be changing dynamically.  More than awareness, Holistic security is also about taking the action to improve the situation, when possible, in a balanced way.  Accordingly, obtaining some valued thing is sometimes not worth risking the valued things you already have.  To be excellent at Holistic Security, one must be ever vigilant, paying special attention to game changing events and trends.  So, we are all in the game, and we all play to win.  Unfortunately, not everyone will win.  This goes for the network security specialist too.

copyright 2013 NetChime Research LLC, All rights reserved